The code for this project can be found on GitHub.
There are approximately 500,000 people in the United States who use American Sign Language (ASL). However, a language is only useful if people understand it. Unfortunately the incentive for the general population to learn ASL is low as it is rare that most people are in a position where they need to use it. It is therefore isolating for ASL users who find themselves in a society where they can only communicate with approximately 0.2% of the population. There is a clear need for technology to assist those who do not know ASL to communicate with those who do. Machine Learning has an obvious role to play in creating models that can recognise ASL hand signs.
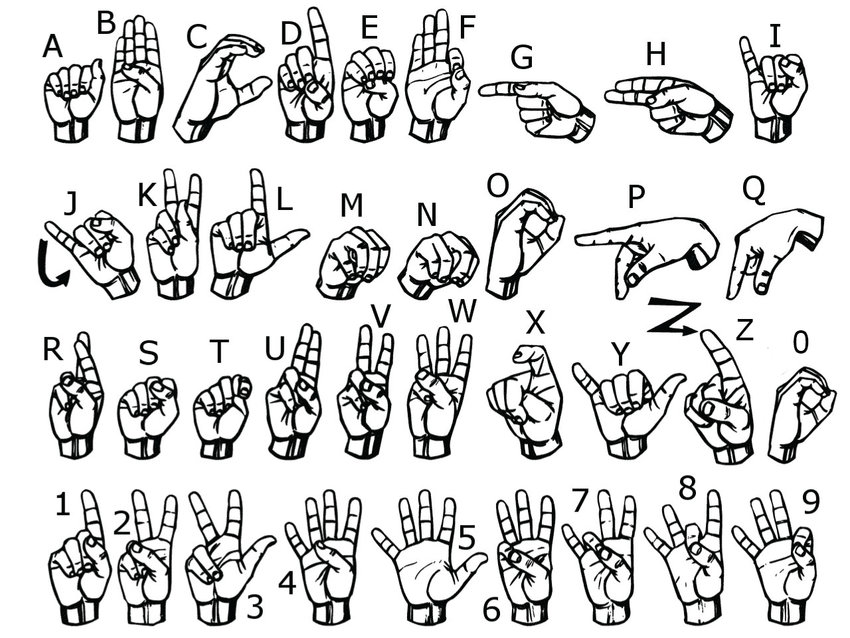
Detecting hand signals is not a particularly difficult challenge for modern Machine Learning models. In fact, during my first experiments at developing this model, a simple multilayer perceptron with only two layers was capable of accurately distinguishing between all of the ASL letters (99% on the test dataset). This model was trained on 28x28 grayscale images (downloadable here) and did not include the letters J and Z as they involve movement. However, the challenge for developing a useful model is in designing one that works well in lots of different situations. The issue with the dataset mentioned is that all of the images are on the same background with the hand oriented in the same direction and the lighting identical. As a result, despite the accuracy of a simple model on the test data, the ability for it to generate accurate predictions in production was very limited. As a result, the old adage that ‘a model is only as good as the data on which it is trained’ very much applies. Performing transformations on the original images improved performance to some extent but the difference was marginal. The solution was therefore to collect more data.
The dataset I created is composed of 256x256 colour images (3279 training images and 1069 test images) and is downloadable here. The hand signs are at different angles and distances and have different backgrounds and lighting. Whilst the model trained from this dataset still works best on a plain background, it shows a much better ability to generalise to new situations. Like the original dataset, the letters J and Z are excluded.
Training
The model is a regular ConvNet consisting of convolutional blocks. Each block consists of a 3x3 convolution layer, a Tanh activation layer and a batch-norm layer. The first convolution is 5x5. The channels dimensions are: 6, 16, 120, 120, 120, 120, 120, 120, 120, 120, 64, 26. To train the model for yourself head to the GitHub repo and use the train.ipynb notebook.

Usage
In order to use the model in practice download or fork the GitHub repo, navigate into it and run:
pip install -r requirements.txt
This will install all necessary libraries (OpenCV, torch and torchvision). Then run:
python app.py
As mentioned, the model works best against a blank background and the hand must be kept within the box, which is the part of the frame that is cropped and forms the input to the model.
App Design
The app uses openCV to access the camera on your device, manipulate the images and produce the output video stream. The key aspects are outlined below but for the full code check the href="https://github.com/theoclark/sign-language" target="_blank">repo.
A combination of a past prediction buffer and a threshold value are used to improve performance. The predictions from the preceding images are kept in the buffer and, for each inference, the mean predictions are taken. If the maximum value is above the threshold value then the letter represented by that index is returned. The buffer size is set to 30 (1 second’s worth of images at 30fps) and the threshold is set at 0.3. This combination was found to work well but can be adjusted easily in the code.
              import cv2
              cap = cv2.VideoCapture(0)
              if not cap.isOpened():
                  raise IOError("Cannot open webcam")
              ret, frame = cap.read()
Access the video stream and return the current frame
              frame_size = 420
              image_size = 256
              input_x, input_y = 20, 250
              output_x, output_y = 800, 250
Set variables. Input and output x/y refer to the top left coordinates of the input and output area.
frame[:,output_y:output_y+frame_size,output_x:output_x+frame_size,:] = 0
Blacken the part of the frame for the output.
              rgb = (255,255,255)
              label_font = cv2.FONT_HERSHEY_SIMPLEX
              frame = cv2.putText(frame, pred, (output_x+100, output_y+frame_size-100), label_font, 8, rgb, 10)
              frame = cv2.rectangle(frame,(input_x, input_y), (input_x+frame_size, input_y+frame_size), white, 2)
              frame = cv2.resize(frame, None, fx=0.5, fy=0.5, interpolation=cv2.INTER_AREA)
Place the output text and a box around the input area over the frame
              cv2.imshow('Input', frame)
              c = cv2.waitKey(1)
Show the image. waitKey(1) displays the image for at least 1ms, allowing time for the next image to be shown.